
There are a lot of opinions that fly around the coffee world about the topic we’re about to dive into—about making the ‘perfect’ cup of pour over coffee. We aim not to enter that discourse, crowded enough as it already is. To us, the beauty of the slow bar brewing style is not in technical perfection, but in the ability to create a ritual out of easing in, smelling the coffee, and taking a morning one minute at a time. So you won’t find any hotly debated extraction theory here, or any heavy defense cases for a double bloom. What we’ve written up is a recipe for the coffee in your cupboard already. It’s a method to bring out the beauty of your coffee’s natural flavor profile, while keeping the brewing process relatively light and stress-free. Sprinkled throughout the recipe are a few foundational tips to help you make adjustments on your own, if you find your tastebuds wanting the cup a bit bolder, or with a touch less acidity. We hope the process will make the mornings (or nights, all you vagabond mayonaka types) a bit brighter.
We’ve written up a short version first, with the basic measurements of the recipe wrapped up into a neat shorthand. Use it if you’re already familiar with the general process of pour over coffee brewing, or if you’re returning to the recipe for reference (don’t worry, the numbers will stick eventually!) Under that you’ll find the whole thing in gross detail—the coffee to water ratio, proper pour over grind size, the whole nine.
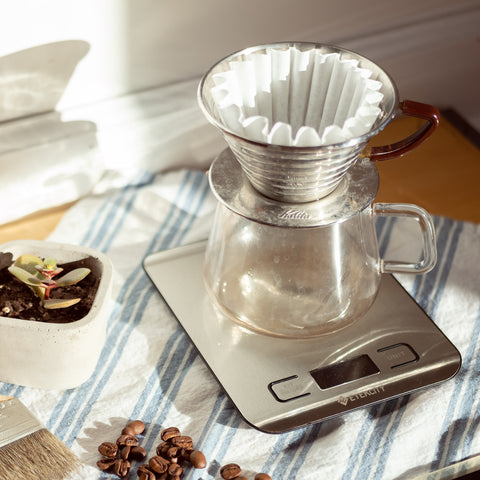
As a final note; we use Kalita Wave drippers at Wesley Andrews, but generally speaking, this recipe can work for the popular Hario V60 brewer as well, or mostly any conical/flatbed mechanism. The important stuff for starting out is generally consistent across the board, so don’t stress too much if your equipment is slightly different than ours. And you can pick up the finer details later if you’re inclined to learn the ins-and-outs of your specific set-up!
Okay, let’s get to it.
What You'll Need:
- Whole Bean Coffee (of your choice! Though we can recommend some if you’d like!)
- Kettle (preferably with a gooseneck, for easier pouring, though anything with a spout is usable with enough patience)
- Scale (gram measuring)
- Coffee Grinder
- Pour Over Dripper
- Paper Filter
The TL;DR Recipe
- Grind. If brewing a light-roast, single-origin coffee, 22 grams of coffee should do the trick. For blends, boost the dose a little. Something between 25 to 30 grams will make those coffees shine a bit more.
- Bloom. With water boiled and filter rinsed, pour your bloom to roughly 60 grams. Give it about 30 seconds to release carbon dioxide.
- Pour, pour, pour. With about 20 second intervals of resting time, pour your spiral to 150 grams, then to 250, and finally to 350. Small swirl if you wish!
- Enjoy.
The Full, Rich-in-Detail Recipe
Point 1 Put some water on to boil.
Our final brew is going to measure out to 10oz of coffee (or about 350 grams on our scale) but we’ll end up using a bit more water than that throughout the brewing process. To be safe, we'll put about a half liter (550ish grams) of water over heat while we start the next steps. We'll want it to reach 205-208º F, or just under boiling, before we begin to pour.
Point 2 Measure out your beans.
We start our pour overs with 22 grams of single origin coffee. You can easily measure this out with a scale, but if you’re eyeballing it, it’s approximately 3 tablespoons worth, assuming your coffee bean is of a medium size. Since different regions of coffee bean can vary in size, we don’t recommend approximations too much, if it can be helped. Using a scale will ensure accurate measurements regardless of the type of bean you prefer for your morning cup. And if you’re using a blend for your pour over, consider taking the dose up to around 25-30 grams.

Point 3 Grind.
We’ve found our favorite cups of coffee have been ground to a medium-coarse size. The size is similar to a cracked sea salt, perhaps a hair finer. We’ve found that grind to deliver the most consistent, balanced brew, but you can tinker here if you like.
The finer the grind, the longer the water will take getting through the bed of grounds. Generally speaking, a longer brew time (i.e. finer grounds) will cause the water to extract more of the coffee. Too long a brew, and the coffee will end up over-extracting, which is typically associated with bitter, harsher flavor notes. On the opposite side, a coarser grind will cause the water to extract less, since it will drip through the bed faster—this usually results in a lighter, sometimes sour finish in the cup. You can always adjust your grind in your next brew, based on your personal preference, and the experience you gained from your last attempt.

A reference of size: Himalayan Salt, Whole Coffee Beans, Ground Coffee
If you want another metric to measure the quality of your grind, you can time the brewing process. We do this in the cafe to track the consistency of our brews, and somewhere between 3 to 3½ minutes is a good length to shoot for start-to-finish. So if one brew of yours is hitting 5 minutes, consider grinding coarser next time.
Point 4 Make your bed.
With a Kalita filter in the dripper, pour a small amount of boiling water over the whole pour over set up. Dry filters can transfer a papery flavor to your cup of coffee, and unless college-ruled is a tasting note you’re trying to pull out of your Columbian light-roast, wetting the filter will ensure the only flavors in the final cup are from your coffee beans. (And if you wetted your filter over your mug or decanter, make sure you remember to pour it out, so you don’t accidentally water down your cup!)
Pour the ground coffee into the dripper, giving it a light shake so the bed flattens out. With the whole thing on the scale and ready, tare the scale so that it reads 0 grams.

Point 5 Bloom.
Now for the satisfying section. A ‘bloom’ is the first pour into the bed of grounds, where the coffee releases stored carbon dioxide, reacting to the boiling water and rising in a slow, bubbling stew. We’re going to pour until we reach about 60 grams. Start the pour in the center of the grounds, and slowly make a spiral outward, until the entire bed is wet. Try to go slow—it should take around 10-15 seconds to get the water over the grounds. Now wait, and let the coffee bloom for about 30 seconds.

Point 6 Second Pour.
The remaining process is pretty straight forward—we’ll be doing a few more spiral pours and the cup will be ready to drink. For the second pour, bring the total grams up to 150. This should take another 15 seconds or so. Let it rest another 30 seconds after the pour, and prepare for the third pass.
Point 7 Third Pour.
Same process as the last, but now take the grams up to 250. Let it drip for a few more seconds before the final pour.

Point 8 Final Pour.
This is it—the last one! Pour a final slow, circular motion over the grounds until you reach the golden grammage of 350. Once you finish this last pour, you can give the dripper a small swirl clockwise. For an even extraction, we want the bed of grounds to be as flat as possible; sometimes an uneven pour can be helped by this small gesture.
Once the whole thing has finished dripping, you’ve got a cup of coffee ready and waiting! Sip, and let it lighten the day.

Be courageous and make some changes of your own, if the brew came out different than you expected. Pour overs are technical puzzles, and even the smallest change in pouring rate, grind size, or the coffee’s age since roasting can cause slight to drastic changes in the final cup. Don’t give up if it comes out strange one day—take it as an opportunity to try something new next time!
Feel free to leave a question down below as well—we will try to clarify anything we haven’t touched on here in the comments section.
Till next time, then.
— Wesley Andrews